In this post, I will build a super cool word clock with Arduino and Neopixel LEDs. Such word clocks cost several hundred euros in the trade, but with a little skill, they are also fast self-built. I show you how it works. The electronic base is similar to that of my LED-Matrix.
UPDATE 2022: I built version 2.0 of the Word clock. This time with WiFi and some games to play on it (Pong, Tetris, Snake). Find my blog post about it here.
Material for the word clock
You need the following material for the word clock. Overall they cost less than 100 EURO.
- deep wooden picture frame 24x30cm (or similar size, amazon.de*)
- black adhesive foil (amazon.de*)
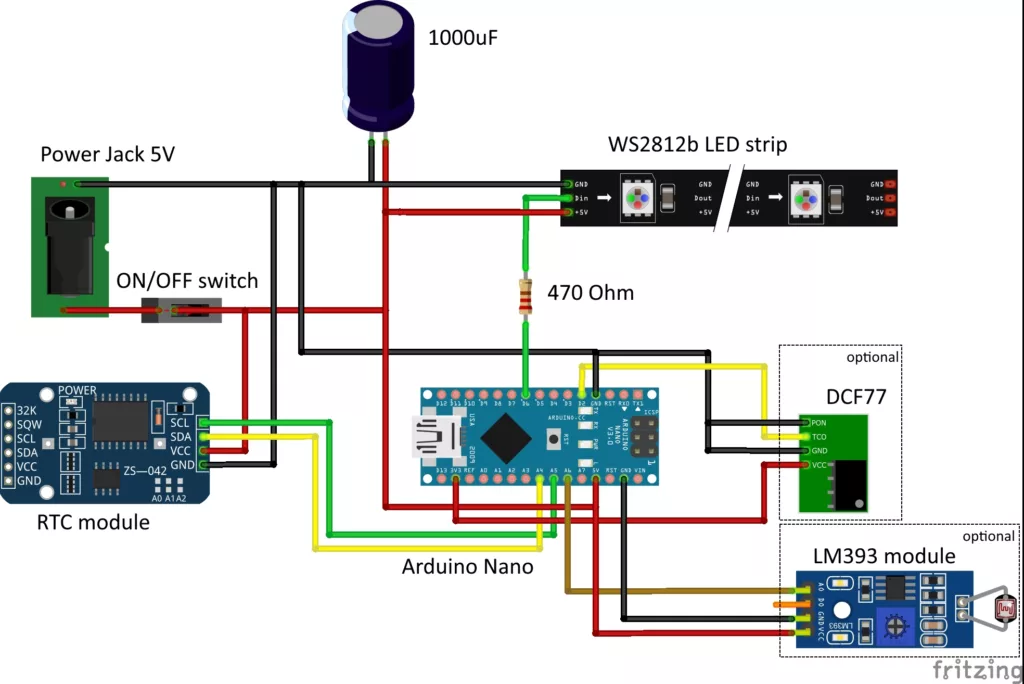
- NeoPixel LED Strip with 114x WS2812b LEDs (60LEDs/m) (amazon.de*)
- Arduino Nano V3.0 (amazon.de*)
- Real-Time-Clock Modul DS3231 (amazon.de*)
- power supply 5V/3A (amazon.de*)
- DC power jack 5.5×2.1 (amazon.de*)
- two sheets of black cardboard
- one sheet of white paper
- some cables, one 470 Ohm resistor, one 1000uF capacitor, one small switch
Optionally you can upgrade the Word Clock with these components:
- DCF77 Receiver Module (amazon.de*)
- LDR light sensor module LM393 (amazon.de*)
- rocker switch as on/off switch (in the power supply lines) (amazon.de*)
- breadboard PCB (amazon.de*)
* The links are affiliate links. The offers do not come from me, however, I receive a commission through the reference, if then a purchase takes place, but without you incurring additional costs.
Step-by-Step instructions
- The first step is to stick the adhesive foils onto the glass pane of the picture frame. Tip: Here it helps to spray the glass pane with detergent water first so that the bubbles can be easily pushed out of the foil afterward.
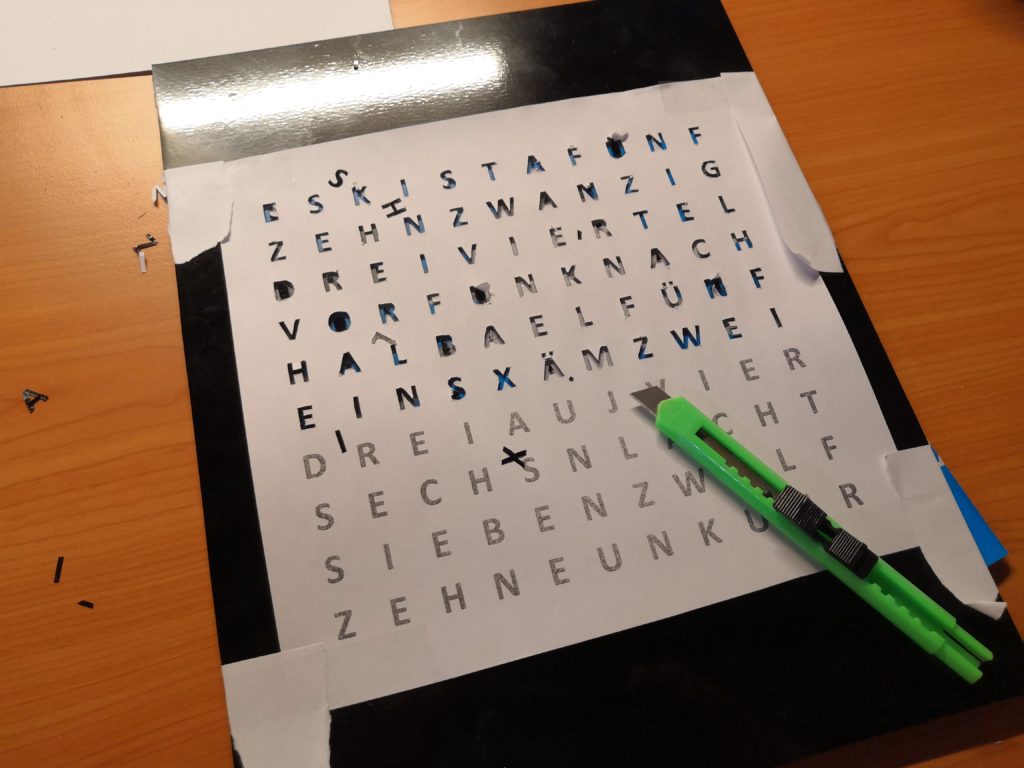
- The most complex task is cutting out the individual letters from the black adhesive foil. The best way to do this is to print out a template with the letters and fix it on the glass pane with adhesive tape. Now the letters can be cut out with a sharp cutter knife.
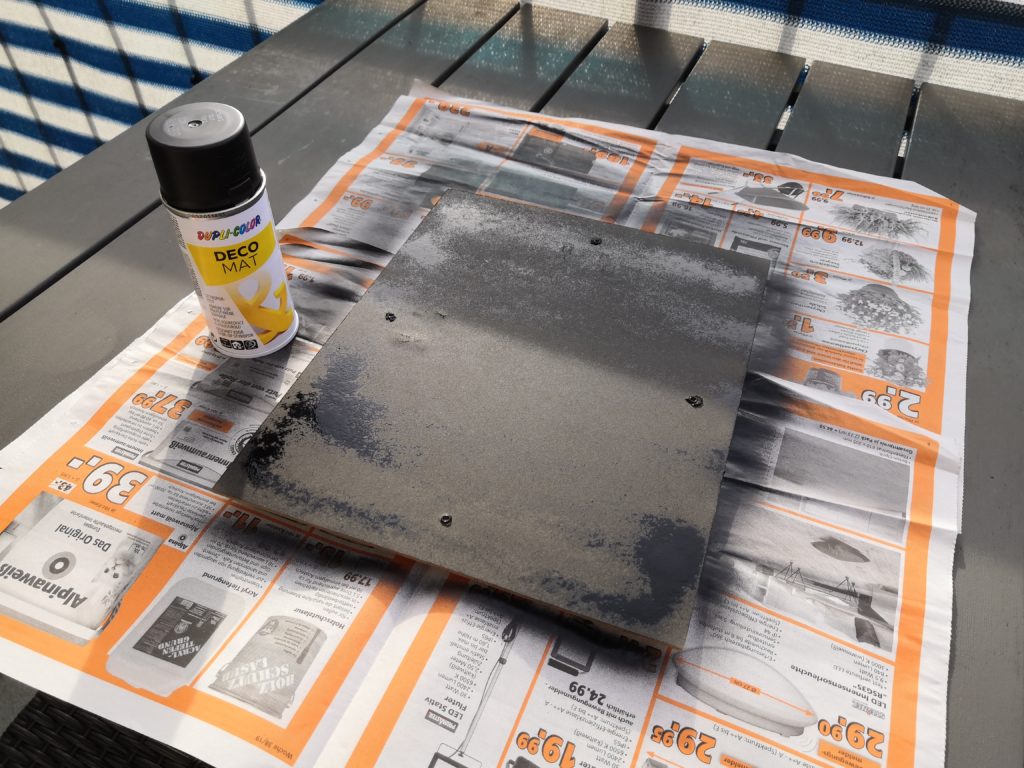
- To avoid reflections, it is recommended to paint the back panel with spray paint.
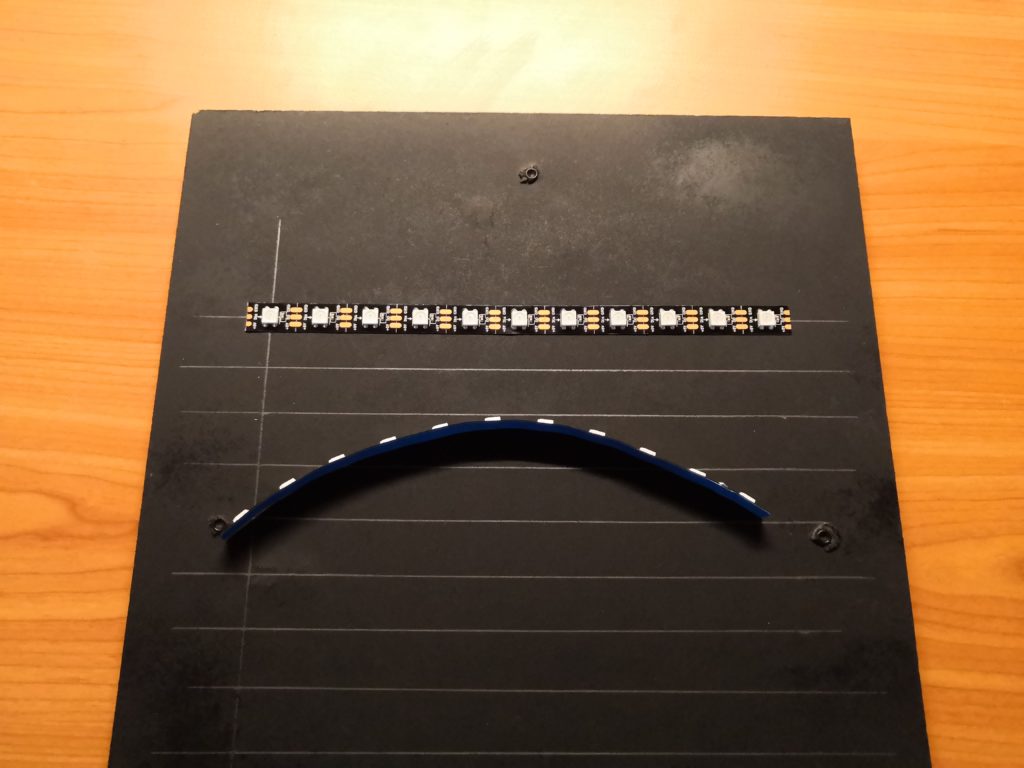
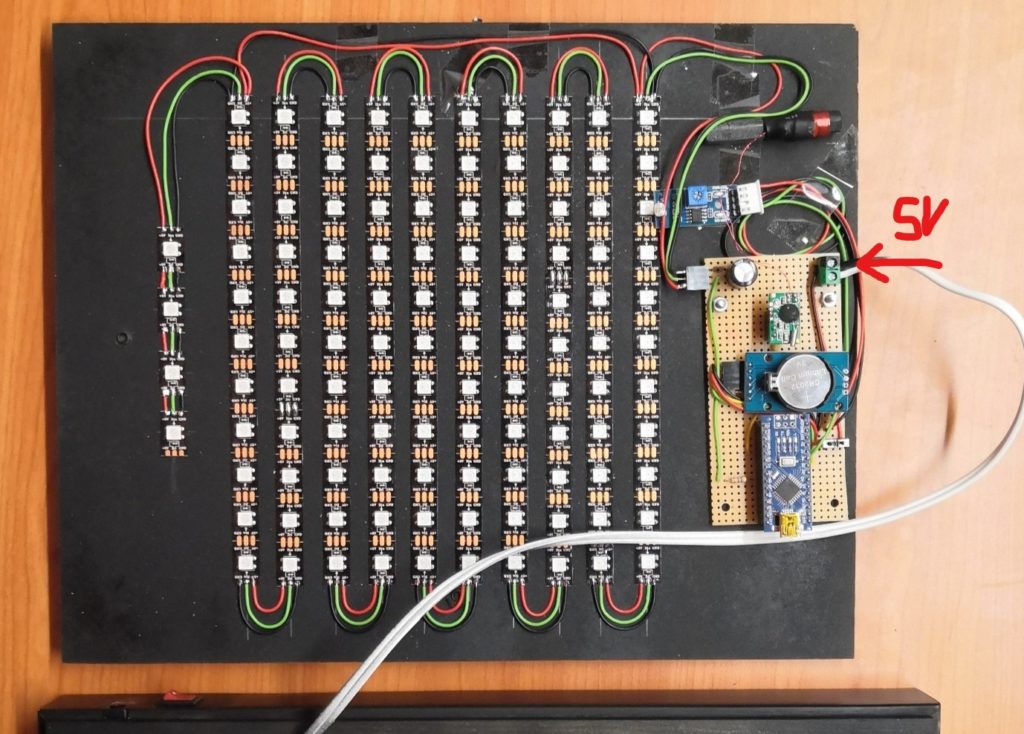
- Now you divide the LED strip into 10 strips of 11 LEDs each and glue them in a zigzag pattern on the back of the picture frame. It helps to mark the desired position on the back panel.
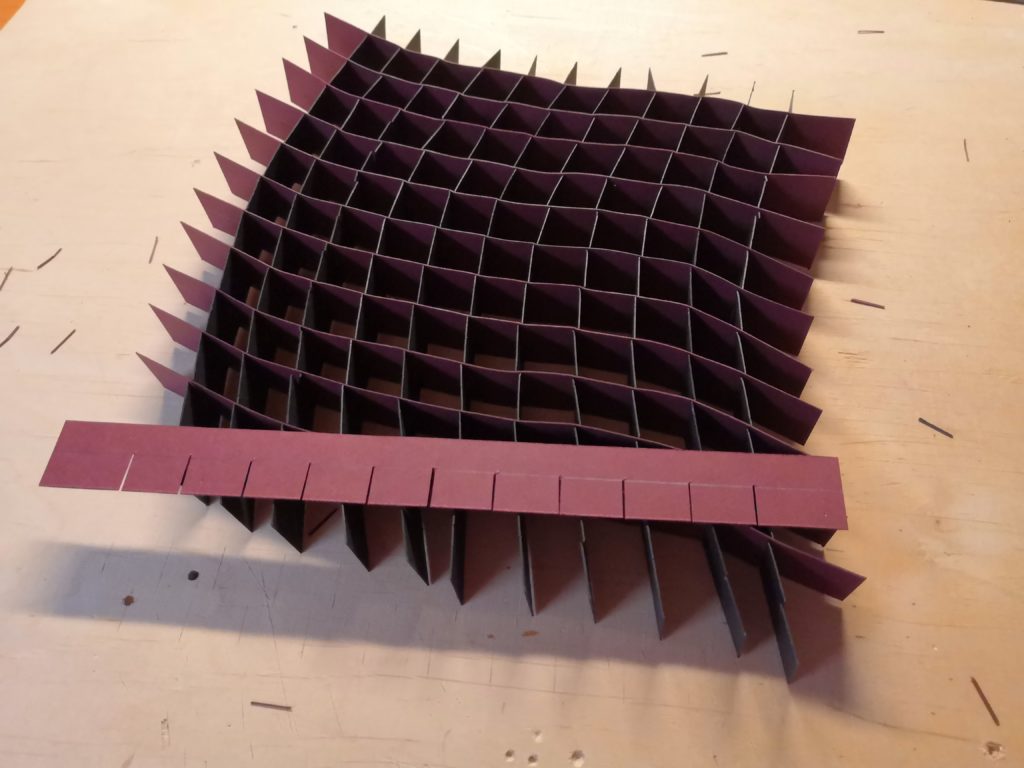
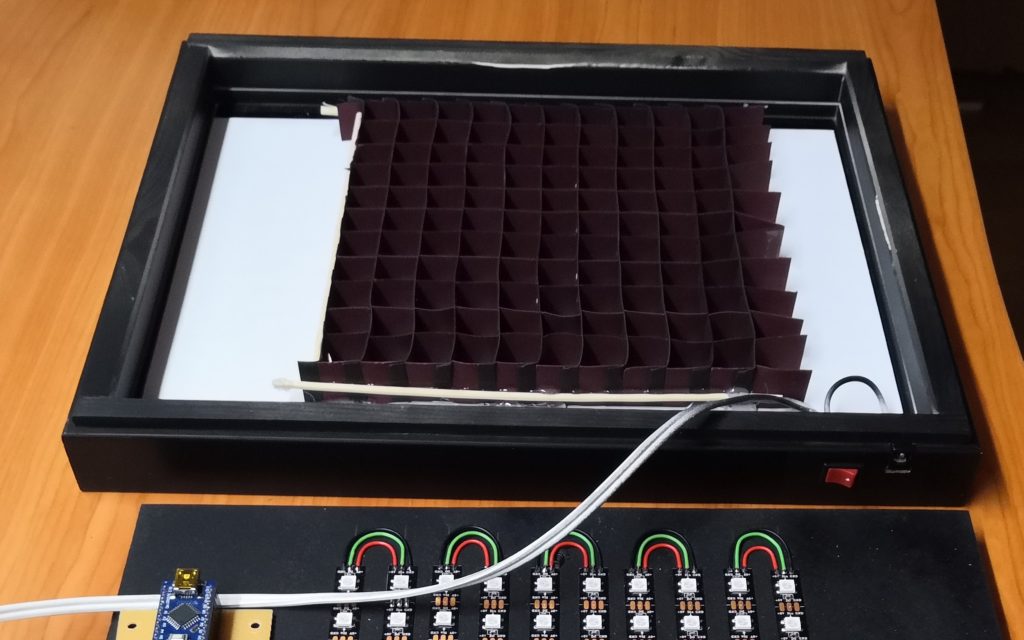
- To reduce stray light from the individual LEDs, we now create a grid structure from the black cardboard. To do this, we cut 2 cm wide strips from the cardboard and cut them 11 or 12 times up to the middle. Afterward, the strips can be put together as grids as shown in the picture below.
- Now it goes to the electronics. We solder the Arduino with the LED strips and the real-time clock (RTC) module. It doesn’t matter if you use a hole board or solder the cables directly. As an add-on, you can add the radio clock receiver module DCF77 and/or the light sensor module for automatic brightness control, but this is not absolutely necessary. The RTC module with its battery always keeps the current time. But without using the radio receiver you have to flash the Arduino again when changing the battery of the RTC module.
techniccontroller / think_wordclock
Arduino source code for the Wordclock on GitHub
- The next step is to flash the software to the Arduino. The complete source code can be found here on GitHub. It also describes which additional libraries need to be installed in the Arduino IDE. While connecting to a computer via USB, the small switch must be turned off (to prevent damage to the Arduino due to the high current drawn by the LEDs).
- So that the letters shine as a whole and not the individual LEDs are visible, we now stick a simple sheet of white paper on the back of the glass plate. Then we fix the grid with hot glue on the glass plate.
- The last step is to insert the glass plate and back panel into the picture frame. You can also add an on/off switch in the picture frame.
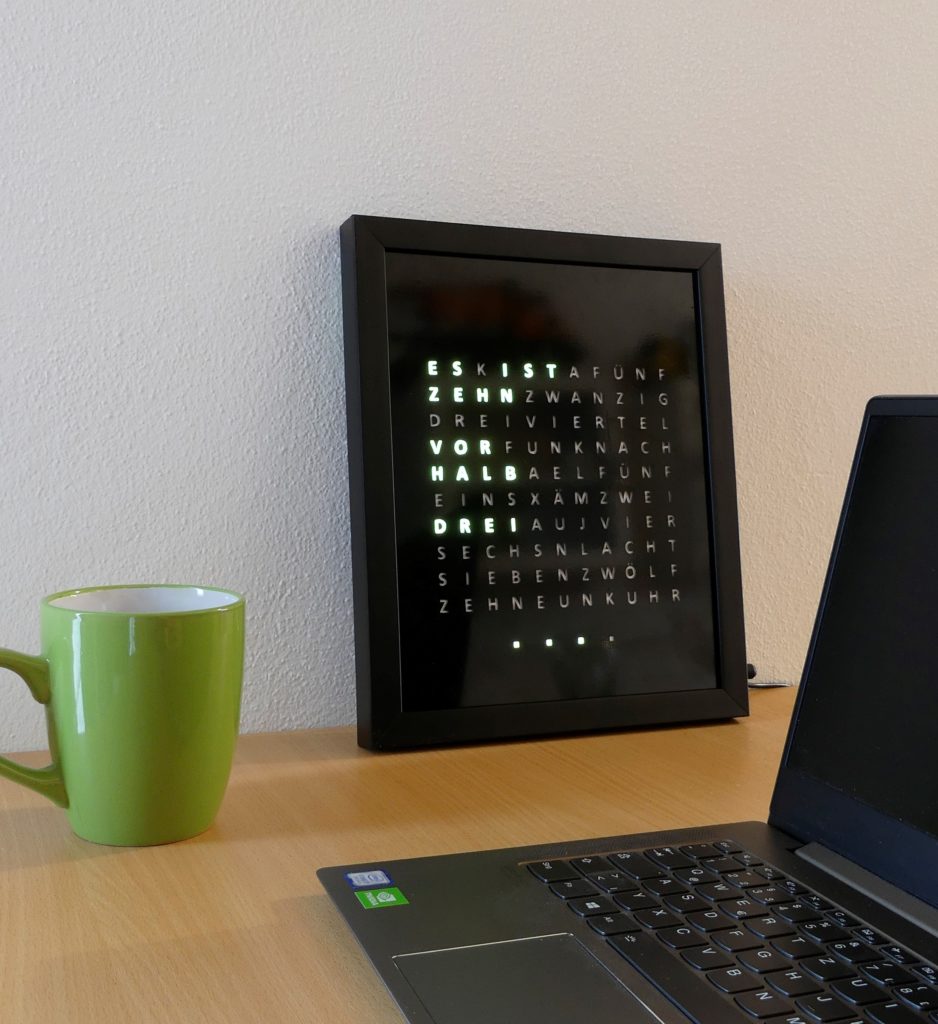
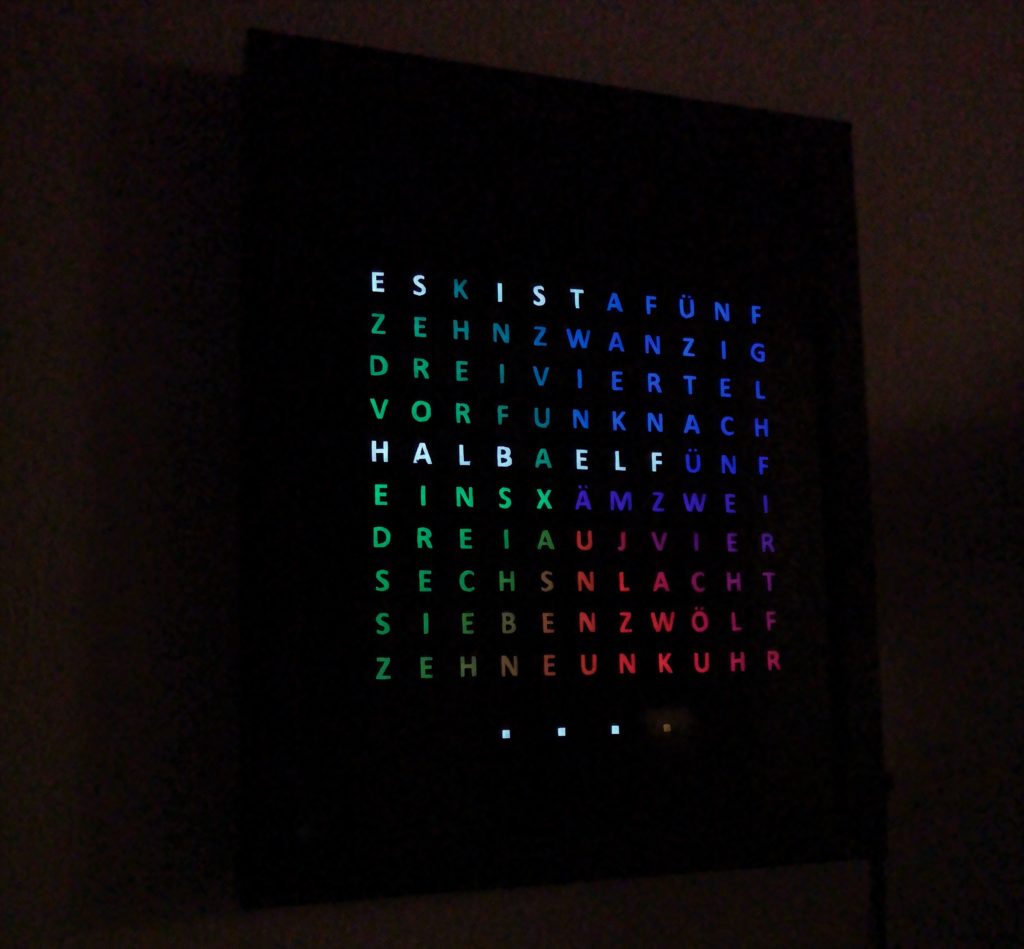
You can extend the project as desired: As some of you might have noticed in the pictures above, a built-in light sensor allows automatic adjustment of the brightness of the LEDs to the environment. I placed the light sensor inside the first “K” and connect it to an analogue input (A6) of the Arduino.
Have fun rebuilding it.
96 Comments
Sandy · 25/10/2021 at 20:03
Hi, I tried da make this Wordclock too. All is finished, but the code will not run. I installed all Library with the Links and tried the Versions. The DFC77.cpp gives so many Faults . I hope you can Help me. Sorry for my English, I’m From Switzerland and if you speak German, better for me.
Like this:
sers/ayleen/Documents/Arduino/libraries/DCF77/DCF77.cpp: In static member function ‘static void DCF77::int0handler()’:
/Users/ayleen/Documents/Arduino/libraries/DCF77/DCF77.cpp:102:14: warning: ISO C++ forbids converting a string constant to ‘char*’ [-Wwrite-strings]
LogLn(“rCT”);
^
/Users/ayleen/Documents/Arduino/libraries/DCF77/DCF77.cpp:109:17: warning: ISO C++ forbids converting a string constant to ‘char*’ [-Wwrite-strings]
LogLn(“rPW”);
^
/Users/ayleen/Documents/Arduino/libraries/DCF77/DCF77.cpp: In static member function ‘static void DCF77::appendSignal(unsigned char)’:
/Users/ayleen/Documents/Arduino/libraries/DCF77/DCF77.cpp:146:14: warning: ISO C++ forbids converting a string constant to ‘char*’ [-Wwrite-strings]
LogLn(“EoB”);
^
/Users/ayleen/Documents/Arduino/libraries/DCF77/DCF77.cpp: In static member function ‘static void DCF77::finalizeBuffer()’:
/Users/ayleen/Documents/Arduino/libraries/DCF77/DCF77.cpp:157:13: warning: ISO C++ forbids converting a string constant to ‘char*’ [-Wwrite-strings]
LogLn(“BF”);
^
/Users/ayleen/Documents/Arduino/libraries/DCF77/DCF77.cpp:160:21: error: ‘now’ was not declared in this scope
filledTimestamp = now();
^~~
/Users/ayleen/Documents/Arduino/libraries/DCF77/DCF77.cpp:160:21: note: suggested alternative: ‘pow’
filledTimestamp = now();
^~~
pow
/Users/ayleen/Documents/Arduino/libraries/DCF77/DCF77.cpp:166:14: warning: ISO C++ forbids converting a string constant to ‘char*’ [-Wwrite-strings]
LogLn(“EoM”);
^
/Users/ayleen/Documents/Arduino/libraries/DCF77/DCF77.cpp: In static member function ‘static bool DCF77::receivedTimeUpdate()’:
/Users/ayleen/Documents/Arduino/libraries/DCF77/DCF77.cpp:183:25: warning: ISO C++ forbids converting a string constant to ‘char*’ [-Wwrite-strings]
LogLn(“Invalid parity”);
^
/Users/ayleen/Documents/Arduino/libraries/DCF77/DCF77.cpp:189:46: error: ‘now’ was not declared in this scope
time_t processedTime = latestupdatedTime + (now() – processingTimestamp);
^~~
/Users/ayleen/Documents/Arduino/libraries/DCF77/DCF77.cpp:189:46: note: suggested alternative: ‘pow’
time_t processedTime = latestupdatedTime + (now() – processingTimestamp);
^~~
pow
/Users/ayleen/Documents/Arduino/libraries/DCF77/DCF77.cpp:191:33: warning: ISO C++ forbids converting a string constant to ‘char*’ [-Wwrite-strings]
LogLn(“Time outside of bounds”);
^
/Users/ayleen/Documents/Arduino/libraries/DCF77/DCF77.cpp:197:20: error: ‘SECS_PER_MIN’ was not declared in this scope
if(difference < 2*SECS_PER_MIN) {
^~~~~~~~~~~~
/Users/ayleen/Documents/Arduino/libraries/DCF77/DCF77.cpp:197:20: note: suggested alternative: 'WCHAR_MIN'
if(difference < 2*SECS_PER_MIN) {
^~~~~~~~~~~~
WCHAR_MIN
/Users/ayleen/Documents/Arduino/libraries/DCF77/DCF77.cpp:198:34: warning: ISO C++ forbids converting a string constant to 'char*' [-Wwrite-strings]
LogLn("close to internal clock");
^
/Users/ayleen/Documents/Arduino/libraries/DCF77/DCF77.cpp:209:25: error: 'SECS_PER_MIN' was not declared in this scope
if(shiftDifference < 2*SECS_PER_MIN) {
^~~~~~~~~~~~
/Users/ayleen/Documents/Arduino/libraries/DCF77/DCF77.cpp:209:25: note: suggested alternative: 'WCHAR_MIN'
if(shiftDifference Min-((rx_buffer->Min/16)*6);
^~~~~~
/Users/ayleen/Documents/Arduino/libraries/DCF77/DCF77.cpp:286:12: error: request for member ‘Hour’ in ‘time’, which is of non-class type ‘time_t(time_t*) {aka long unsigned int(long unsigned int*)}’
time.Hour = rx_buffer->Hour-((rx_buffer->Hour/16)*6);
^~~~
/Users/ayleen/Documents/Arduino/libraries/DCF77/DCF77.cpp:287:12: error: request for member ‘Day’ in ‘time’, which is of non-class type ‘time_t(time_t*) {aka long unsigned int(long unsigned int*)}’
time.Day = rx_buffer->Day-((rx_buffer->Day/16)*6);
^~~
/Users/ayleen/Documents/Arduino/libraries/DCF77/DCF77.cpp:288:12: error: request for member ‘Month’ in ‘time’, which is of non-class type ‘time_t(time_t*) {aka long unsigned int(long unsigned int*)}’
time.Month = rx_buffer->Month-((rx_buffer->Month/16)*6);
^~~~~
/Users/ayleen/Documents/Arduino/libraries/DCF77/DCF77.cpp:289:12: error: request for member ‘Year’ in ‘time’, which is of non-class type ‘time_t(time_t*) {aka long unsigned int(long unsigned int*)}’
time.Year = 2000 + rx_buffer->Year-((rx_buffer->Year/16)*6) -1970;
^~~~
/Users/ayleen/Documents/Arduino/libraries/DCF77/DCF77.cpp:290:24: error: ‘makeTime’ was not declared in this scope
latestupdatedTime = makeTime(time);
^~~~~~~~
/Users/ayleen/Documents/Arduino/libraries/DCF77/DCF77.cpp:290:24: note: suggested alternative: ‘mktime’
latestupdatedTime = makeTime(time);
^~~~~~~~
mktime
/Users/ayleen/Documents/Arduino/libraries/DCF77/DCF77.cpp: In static member function ‘static time_t DCF77::getTime()’:
/Users/ayleen/Documents/Arduino/libraries/DCF77/DCF77.cpp:310:44: error: ‘now’ was not declared in this scope
time_t currentTime =latestupdatedTime + (now() – processingTimestamp);
^~~
/Users/ayleen/Documents/Arduino/libraries/DCF77/DCF77.cpp:310:44: note: suggested alternative: ‘pow’
time_t currentTime =latestupdatedTime + (now() – processingTimestamp);
^~~
pow
/Users/ayleen/Documents/Arduino/libraries/DCF77/DCF77.cpp: In static member function ‘static time_t DCF77::getUTCTime()’:
/Users/ayleen/Documents/Arduino/libraries/DCF77/DCF77.cpp:325:42: error: ‘SECS_PER_HOUR’ was not declared in this scope
int UTCTimeDifference = (CEST ? 2 : 1)*SECS_PER_HOUR;
^~~~~~~~~~~~~
/Users/ayleen/Documents/Arduino/libraries/DCF77/DCF77.cpp:326:64: error: ‘now’ was not declared in this scope
time_t currentTime =latestupdatedTime – UTCTimeDifference + (now() – processingTimestamp);
^~~
/Users/ayleen/Documents/Arduino/libraries/DCF77/DCF77.cpp:326:64: note: suggested alternative: ‘pow’
time_t currentTime =latestupdatedTime – UTCTimeDifference + (now() – processingTimestamp);
^~~
pow
exit status 1
Error compiling for board Arduino Uno.
Techniccontroller · 25/10/2021 at 21:59
Hallo Sandy,
ich habe gerade bemerkt, dass es bei den Bibliotheken zu Kompatibilitätsprobleme kommen kann, wie du sie gesehen hast (durch verschieden Versionen die es gibt). Ich habe daher genau meine Versionen der Bibliotheken auf GitHub hochgeladen. Damit sollte es ohne Probleme funktionieren den Code zu kompilieren.
https://github.com/techniccontroller/think_wordclock
In English:
I have just noticed that there can be compatibility issues with the libraries as you have seen (due to different versions being available). I have therefore uploaded exactly my versions of the libraries to GitHub. With this, it should work without problems to compile the code.
BR
Edgar
sandy · 26/10/2021 at 15:54
Danke für die schnelle Antwort. Gibt es eine Möglichkeit , die Library in einem Stück runterzuladen? Vielleicht war das jetzt ne blöde Frage, aber…ich kann nur einzelne als ziel speichern, es erzeugt dann ein html daraus, wo ich den Suffix html wieder entferne. Mac Safari Browser.
Techniccontroller · 26/10/2021 at 16:54
Du kannst einfach das ganze Repository als zip-Archiv runterladen. Dazu einfach in GitHub auf den grünen Button “Code” klicken und “Download ZIP” auswählen.
VG
Edgar
Sandy · 26/10/2021 at 18:51
Ich konnte zum ersten mal Compilieren. WOW. Vielen Dank. Jetzt kann ich endlich den Arduino Einbauen und schauen on dann auch ein paar Wörter leuchten. Schon mal vielen Dank im Voraus. Mal sehen obs wirklich klappt.
Sandy · 27/10/2021 at 22:11
Ich muss dir grossen Dank aussprechen. Die Uhr ist fertig. Sogar auf Schweizerdeutsch. Ob der DCF77 gut funktioniert sehen wir in Zukunft. Im Moment sieht es einfach nur toll aus. Alle Teile mit dem 3D Drucker erstellt. Danke nochmals
Techniccontroller · 28/10/2021 at 13:42
Super!. Freut mich. Viel Spaß mit der Uhr.
Margo · 19/10/2021 at 7:50
Thank you for the fast response! It worked 🙂
The only thing is the leds are shining in red and I prefer white. Should I change the activeColorID or how does it work?
Thanks a lot for helping me! It is a gift and they will absolutely love it!
Kind regards,
Margo
Techniccontroller · 19/10/2021 at 8:15
Hello Margo,
you can turn OFF and ON the Wordclock within 10 seconds to switch the color (activeColorID will be incremented each time). The color will persist. There are seven different colors implemented.
BR
Edgar
Margo · 18/10/2021 at 19:39
Hi Edgar!
Love this tutorial! Helped me a lot! I was wondering if I could change the code, such that the color matrix is turned off at night. So only the intended leds are shining in white all the time. Can you please tell me how to do it? 🙂
Thanks in advance!
Kind regards,
Margo
Techniccontroller · 18/10/2021 at 20:06
Hello Margo,
thanks for your comment. Of course, this is possible. I created a variant of the source code on GitHub with a ‘nightmode’ implemented.
See: https://github.com/techniccontroller/think_wordclock/commit/78d81ef1648b1820b1d0fde8f827e4d95505c185
I hope it helps you. If you have more questions please feel free to ask.
I did not test the code, because do not have hardware by hand.
BR
Edgar
Margo · 19/10/2021 at 7:49
Thank you for the fast response! It worked 🙂
The only thing is the leds are shining in red and I prefer white. Should I change the activeColorID or how does it work?
Thanks a lot for helping me! It is a gift and they will absolutely love it!
Kind regards,
Margo
Diddy · 27/04/2021 at 8:17
BTW: If you are based in Switzerland or Germany: Feel free to send me your Paypal / Twint account to my Mail. I happy to support you with some Beers for this work!
Diddy · 29/03/2021 at 15:58
Hi there!
Thank you very much for this tutorial! I love it and have used the source code for my own wordclock in a decent bigger format of 50x50cm 😉
However, one issue is bothering me: I am trying to set the European daylight-saving (Sommerzeit) to the wordclock. Unfortuntely the clock sticks to the standard time. How have you solved this issue on your side?
Best, Diddy
Techniccontroller · 10/04/2021 at 12:27
Hello Diddy,
thank you for your comment. Do you also use the DFC77 or just the RTC? If you are using the DFC77 then the time should be correct (always German time).
If you are using the RTC, then it will update the time to the time of the computer you are used for flashing the arduino (but only after you removed the battery of RTC for short time).
PS: I did a little bugfixing on github, a few days back to update the time of RTC more often with the time from DFC77.
BR
Edgar
Diddy · 27/04/2021 at 8:14
Hi Edgar
Thank you for your reply and the additional information.
Yes, indeed, using the DFC works perfectly fine (before I haven’t had it attached). And thank you for the new version – It’s now adapted to Swiss German.
If you don’t mind, I would have one last question: I like the colors of the background. However, might it be possible to light-up some dedicated LEDs only (instead of the entire matrix)? The reason is, that I have added some “hidden” text which would like to illuminate. I have tried to add a new condition to the code, but it seem like I am not a well developer 😉
BR, Diddy
Techniccontroller · 01/05/2021 at 12:49
Hello Diddy,
sorry for the late reply. I usally have only on the weekend time to work on the website :).
I sent a mail to you. I think I can help you with your question.
BR
Edgar